
If you highlight a section of the recording in Audacity, it tells you the start point and either the end point or the length of the section as well. Except it doesn't go down to enough decimal places, even when set to milliseconds it said either 0.001 or 0.000 for me. Not overly helpful when that last decimal place is being rounded.
What I did was switch that section to just display samples. Now it shows you the number of samples you've highlighted. If your project rate is 192,000Hz that means you have 192,000 samples per second.
1 second / 192,000 samples = 0.0000052083333 seconds per sample or 5.2083333 microseconds.
Highlight from the beginning of a state change in Audacity and multiply that value by 5.2083333 to get the value we need.

In this screenshot I'm highlighting an 'on' state (on is negative dB) and seeing the 98 samples listed as length calculates as 98 * 5.2083333 = 510 microseconds. You can get away with things being slightly out, a sample here or there doesn't seem to affect the boiler as its within its error tolerances it would seem. Either that or I got lucky with my code the first time ;)
Work out the time of every state change, on/off all the way along the set of pulses until you hit that 100ms gap at the end.
You'll notice the first two thirds of both the on and off pulses are the same. The thermostat sends an identifying signal before the payload so the boiler knows the signal is coming from it.
My code puts this first section into one array, then seperate arrays for the on and off signals. Whenever it sends a signal it runs the identifier array through a transmit function followed by the appropriate command.
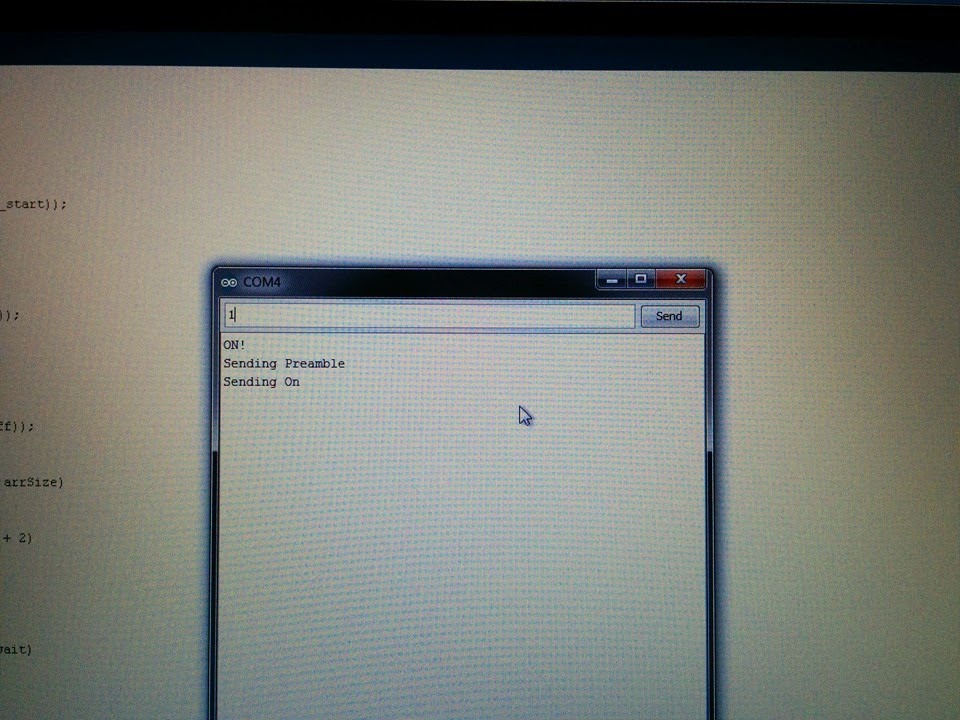
This is my basic 'test' code, paste your timings into the arrays at the top and upload to your Arduino. Open a serial console and send the number 1 to get the system to transmit the on, anything else to turn it off. You should see your boiler react accordingly!
 //define the arrays thatdetermine how long to transmit/wait between pulses
 //values are in on/off pairs, microseconds (1/1,000,000 of a second)
 //1000 microseconds = 1 millisecond (ms)
 //1ms = 1000/second

 //192Hz = 192,000 times a second
 //so each sample = 5.2083333 us long
 //96 samples therefore = 500us
 int comms_start[] = {
  520,500,
  520,500,
  520,500,

 // ... many... many more rows...
 //containing my boiler ID and knowing my friends
 //someone would find it funny to control my boiler for me ;)

  520,1000,
  520,500,
  520,500
 };

 int comms_on[] = {
  1000,1000,
  520,500,
  520,500,
  520,500,
  1000,1000,
  1000,500,
  520,500,
  520,1000,
  520,500,
  520,0
 };

 int comms_off[] = {
  520,500,
  520,500,
  520,500,
  520,500,
  520,500,
  520,500,
  520,500,
  1000,500,
  520,500,
  520,1000,
  520,500,
  520,0
 };

 #define INT_SIZE sizeof(int);

 //define the digital pin the transmitter data pin is connected to
 int txPin = 4;

 void setup()
 {
  Serial.begin(9600);
  pinMode(txPin, OUTPUT);
 }

 void loop()
 {
  if(Serial.available() > 0)
  {
   //something in the serial buffer
   int incoming = Serial.read();

   if(incoming == 49) //char code for 1
   {
    //turn the heating on
    Serial.println("ON!");
    turnHeatingOn();
   }
   else
   {
    //turn the heating off
    Serial.println("OFF!");
    turnHeatingOff();
   }
  }
 }

 void turnHeatingOn()
 {
  sendPreambleAndBoilerID();
  sendOn();
 }

 void turnHeatingOff()
 {
  sendPreambleAndBoilerID();
  sendOff();
 }

 void sendPreambleAndBoilerID()
 {
  Serial.println("Sending Preamble");
  sendArray(comms_start, sizeof(comms_start));
 }

 void sendOn()
 {
  Serial.println("Sending On");
  sendArray(comms_on, sizeof(comms_on));
 }

 void sendOff()
 {
  Serial.println("Sending Off");
  sendArray(comms_off, sizeof(comms_off));
 }

 void sendArray(const int start[], int arrSize)
 {
  int arrLength = arrSize / INT_SIZE;
  for(int i = 0; i < arrLength; i = i + 2)
  {
   transmit(start[i], start[i+1]);
  }
 }

 void transmit(int uS_transmit,int uS_wait)
 {
  //turn on transmitter
  bitWrite(PORTD,txPin, 1);

  //wait the right amount of time
  delayMicroseconds(uS_transmit);

  //turn off the transmitter
  bitWrite(PORTD,txPin, 0);

  //and wait out its delay before the next 'on' can occur
  delayMicroseconds(uS_wait);
} 
Roger, thank you very much for this. Like you, I was inspired by Steve Hale's original page, but this was my first Arduino project and I'm grateful for your detailed code above.
ReplyDeleteI plan to add Internet control to a Celsia CZC3 controller, as used by the company Heat Electric and various other manufacturers of electric radiators.
Much to my surprise, on/off control from the Arduino worked at the first attempt. The pulses I recorded are not as nicely shaped as yours, and I recorded at 44.1 kHz because that's the maximum for my sound card. Nonetheless, I don't think you need to be super-accurate. I found that for the Celsia CZC3 there is a basic pulse length of about 2450 µs, and that all pulses seem to be multiples of 1, 2, 3 or 4 of this unit.
Now with your guidance it's on to the Pi part…